BACKUPPC INSTALLATION AND CONFIGURATIONS
BackupPC is a backup solution that can be configured to back up remote Linux and Windows systems. It can use a variety of different protocols and has a flexible scheduler to coordinate full and incremental backups.
I have installed this on ubutnu 14.04 LTS and its running fine for me for a long time since the installation
Open a terminal and enter the following commands:
sudo apt-get update
sudo apt-get install backuppc
During the installation, you will be asked what kind of mail server configuration is needed. We can select the "Local only" option, because we will not be configuring internet-aware mail
Now change the password for backuppc
htpasswd /etc/backuppc/htpasswd backuppc
Enter the password when prompted.

create an SSH key pair for BackupPC user called backuppc and then transfer this key to the client computers.
Type
sudo su – backuppc

Generate an SSH key pair:
ssh-keygen
You will be prompted for three questions. Just press Enter to accept the default values.

Now we have the key pair, we need to transfer the public key.
Transferring the SSH Public Key
On the client computer, make sure you have the following configured:
We need to enable root account for SSH access. To do that, edit the file /etc/ssh/sshd_config and comment the line:
#PermitRootLogin without password
Add the line:
PermitRootLogin yes
Then restart SSH:
service ssh restart.
Note: you do not need the following user configured, but for my convenience, I have added a login for my own testing later. Ignore the italic text below.
useradd chuong
passwd chuong
mkdir /home/chuong
chown chuong:chuong /home/chuong
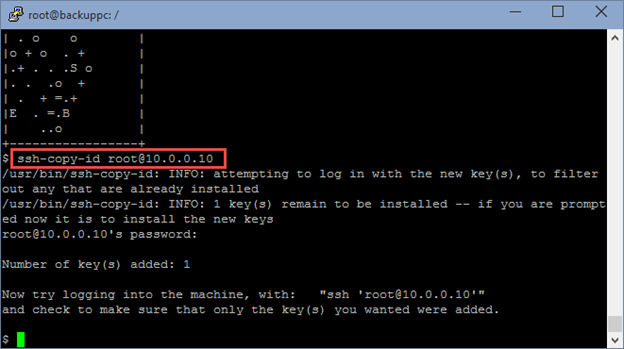
Now copy the key to the client computer:
ssh-copy-id root@10.0.0.10 (note that 10.0.0.10 is another Linux system I want to work as a client machine).

SSH to root@10.0.0.10, you should be able to directly SSH to the client without having to supply a password for the user root. Verify that is the case.

Now type exit to close the connection to 10.0.0.10. Type exit again to exit the user backuppc and go back to the default currently logged in user.

Launch your browser and go to this URL:
http://10.0.0.12/backuppc.
Note: If for any reasons, the web page does not show up but it asks you to download a file that contains garbage characters in it (most probably happens in Ubuntu 14.04.1), you need to perform the followings to fix it:
rm /etc/apache2/conf-enabled/backuppc.conf
sudo ln /etc/backuppc/apache.conf /etc/apache2/conf-enabled/backuppc.conf
service apache2 restart
Then try again. When prompted for a credentials, use backuppc as the user name and the password you changed earlier.
Shown below is the main interface of BackupPC.

We need to setup the client computer for backup. On the left hand side, click Edit Hosts.
 Now click Add to add the client host.

Enter the IP address of the client computer, the user name should be backuppc. Click Add when done.
 Enter the IP address of the client computer, the user name should be backuppc. Click Add when done.

Click Xfer tab. Under XferMethod, choose rsync. Under RsyncShareName, click Add to choose a directory to backup. You can leave it as “/” to backto the entire the computer if you want.


Click the Hosts tab and then click the Select a Host drop down list.


Click Start Full Backup to confirm.

The backup will happen and it


Click on the backup job to see backed up files.


BackupPC is a backup solution that can be configured to back up remote Linux and Windows systems. It can use a variety of different protocols and has a flexible scheduler to coordinate full and incremental backups.
I have installed this on ubutnu 14.04 LTS and its running fine for me for a long time since the installation
Open a terminal and enter the following commands:
sudo apt-get update
sudo apt-get install backuppc
During the installation, you will be asked what kind of mail server configuration is needed. We can select the "Local only" option, because we will not be configuring internet-aware mail
                ???????? Postfix Configuration ?????????
                ? General type of mail configuration:  ?
                ?                                      ?
                ?       No configuration               ?
                ?       Internet Site                  ?
                ?       Internet with smarthost        ?
                ?       Satellite system               ?
                ?       Local only                     ?
                ?                                      ?
                ?                                      ?
                ?                          ?
                ?                                      ?
                ????????????????????????????????????????
 ??????????????????????????? Postfix Configuration ???????????????????????????
 ? The "mail name" is the domain name used to "qualify" _ALL_ mail           ?
 ? addresses without a domain name. This includes mail to and from :   ?
 ? please do not make your machine send out mail from root@example.org       ?
 ? unless root@example.org has told you to.                                  ?
 ?                                                                           ?
 ? This name will also be used by other programs. It should be the single,   ?
 ? fully qualified domain name (FQDN).                                       ?
 ?                                                                           ?
 ? Thus, if a mail address on the local host is foo@example.org, the         ?
 ? correct value for this option would be example.org.                       ?
 ?                                                                           ?
 ? System mail name:                                                         ?
 ?                                                                           ?
 ? localhost________________________________________________________________ ?
 ?                                                                           ?
 ?
???????????????????? Configuring backuppc ???????????????????????????
? BackupPC supports any web server with CGI enabled, but this automatic ?
? configuration process only supports Apache. ?
? ?
? Which web server would you like to reconfigure automatically: ?
? ?
? [*] apache2 ?
? ?
? ?
? ?
? ?
??????????????????????????????????????????????????????????????????????????? Now change the password for backuppc
htpasswd /etc/backuppc/htpasswd backuppc
Enter the password when prompted.

create an SSH key pair for BackupPC user called backuppc and then transfer this key to the client computers.
Type
sudo su – backuppc

Generate an SSH key pair:
ssh-keygen
You will be prompted for three questions. Just press Enter to accept the default values.

Now we have the key pair, we need to transfer the public key.
Transferring the SSH Public Key
On the client computer, make sure you have the following configured:
We need to enable root account for SSH access. To do that, edit the file /etc/ssh/sshd_config and comment the line:
#PermitRootLogin without password
Add the line:
PermitRootLogin yes
Then restart SSH:
service ssh restart.
Note: you do not need the following user configured, but for my convenience, I have added a login for my own testing later. Ignore the italic text below.
useradd chuong
passwd chuong
mkdir /home/chuong
chown chuong:chuong /home/chuong
Now copy the key to the client computer:
SSH to root@10.0.0.10, you should be able to directly SSH to the client without having to supply a password for the user root. Verify that is the case.


Launch your browser and go to this URL:
http://10.0.0.12/backuppc.
Note: If for any reasons, the web page does not show up but it asks you to download a file that contains garbage characters in it (most probably happens in Ubuntu 14.04.1), you need to perform the followings to fix it:
rm /etc/apache2/conf-enabled/backuppc.conf
sudo ln /etc/backuppc/apache.conf /etc/apache2/conf-enabled/backuppc.conf
service apache2 restart
Then try again. When prompted for a credentials, use backuppc as the user name and the password you changed earlier.
Shown below is the main interface of BackupPC.

At this point /var/lib/backuppc is the default backuppc storage location and also the home directory of user backuppc.
Configure Client for BackupWe need to setup the client computer for backup. On the left hand side, click Edit Hosts.


Enter the IP address of the client computer, the user name should be backuppc. Click Add when done.


Configure Transfer Method
We will use rsync to transfer. Now we will configure this setting.Click Xfer tab. Under XferMethod, choose rsync. Under RsyncShareName, click Add to choose a directory to backup. You can leave it as “/” to backto the entire the computer if you want.

I add /etc/ppp to backup. Note that if you choose to backup the entire computer (using /), you have to exclude the /proc and the /sys directories. For now, remove the / so that the entire system is not backed up. We just want to backup /etc/ppp. Click Save.

CLick Schedule to check the backup schedules. As you can see, by default, full backup happens every 6.97 days and incremental backup happens every 0.97 days. We can keep these settings as is.

Run backup Manually
Let’s run the backup manually instead of waiting for 7 days.Click the Hosts tab and then click the Select a Host drop down list.

Click Start Full Backup

Click Start Full Backup to confirm.

The backup will happen and it

The backup should finish shortly as there are only a few files in our demonstration. The backup is stored at: /var/lib/backuppc/pc/10.0.0.10/#_of_backup.
In the Web interface, click the link to go back to the home page.
Click on the backup job to see backed up files.

As you can see, the directory /etc/ppp has been successfully backed up and the contents is stored on the backup server.


https://www.youtube.com/watch?v=Ij8UMJk5e30&t=263s
ReplyDeleteis there any update avalaible for this ?
ReplyDelete