How to enable SMB Windows
The Server Message Block (SMB) Protocol is a network file sharing protocol, and as implemented in Microsoft Windows is known as Microsoft SMB Protocol. The Common Internet File System (CIFS) Protocol is a dialect of SMB. Both SMB and CIFS are also available on VMS, several versions of Unix, and other operating systems.
Although its main purpose is file sharing, additional Microsoft SMB Protocol functionality includes the following:
Dialect negotiation
Determining other Microsoft SMB Protocol servers on the network, or network browsing
Printing over a network
File, directory, and share access authentication
File and record locking
File and directory change notification
Extended file attribute handling
Unicode support
Opportunistic locks
For security reasons, Microsoft recommends that you disable SMB1 immediately.
to enable on windows 10
go to control panel > programs and features > turn windows features on or off
and Scroll down to SMB 1.0/CIFS File Sharing Support

BACKUPPC INSTALLATION AND CONFIGURATIONS
BACKUPPC INSTALLATION AND CONFIGURATIONS
BackupPC is a backup solution that can be configured to back up remote Linux and Windows systems. It can use a variety of different protocols and has a flexible scheduler to coordinate full and incremental backups.
I have installed this on ubutnu 14.04 LTS and its running fine for me for a long time since the installation
Open a terminal and enter the following commands:
sudo apt-get update
sudo apt-get install backuppc
During the installation, you will be asked what kind of mail server configuration is needed. We can select the "Local only" option, because we will not be configuring internet-aware mail
Now change the password for backuppc
htpasswd /etc/backuppc/htpasswd backuppc
Enter the password when prompted.

create an SSH key pair for BackupPC user called backuppc and then transfer this key to the client computers.
Type
sudo su – backuppc

Generate an SSH key pair:
ssh-keygen
You will be prompted for three questions. Just press Enter to accept the default values.

Now we have the key pair, we need to transfer the public key.
Transferring the SSH Public Key
On the client computer, make sure you have the following configured:
We need to enable root account for SSH access. To do that, edit the file /etc/ssh/sshd_config and comment the line:
#PermitRootLogin without password
Add the line:
PermitRootLogin yes
Then restart SSH:
service ssh restart.
Note: you do not need the following user configured, but for my convenience, I have added a login for my own testing later. Ignore the italic text below.
useradd chuong
passwd chuong
mkdir /home/chuong
chown chuong:chuong /home/chuong
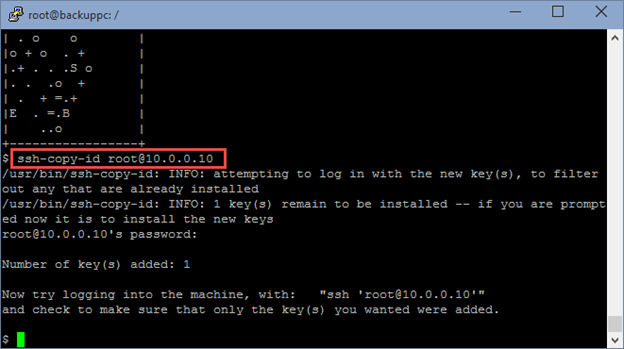
Now copy the key to the client computer:
ssh-copy-id root@10.0.0.10 (note that 10.0.0.10 is another Linux system I want to work as a client machine).

SSH to root@10.0.0.10, you should be able to directly SSH to the client without having to supply a password for the user root. Verify that is the case.

Now type exit to close the connection to 10.0.0.10. Type exit again to exit the user backuppc and go back to the default currently logged in user.

Launch your browser and go to this URL:
http://10.0.0.12/backuppc.
Note: If for any reasons, the web page does not show up but it asks you to download a file that contains garbage characters in it (most probably happens in Ubuntu 14.04.1), you need to perform the followings to fix it:
rm /etc/apache2/conf-enabled/backuppc.conf
sudo ln /etc/backuppc/apache.conf /etc/apache2/conf-enabled/backuppc.conf
service apache2 restart
Then try again. When prompted for a credentials, use backuppc as the user name and the password you changed earlier.
Shown below is the main interface of BackupPC.

We need to setup the client computer for backup. On the left hand side, click Edit Hosts.
 Now click Add to add the client host.

Enter the IP address of the client computer, the user name should be backuppc. Click Add when done.
 Enter the IP address of the client computer, the user name should be backuppc. Click Add when done.

Click Xfer tab. Under XferMethod, choose rsync. Under RsyncShareName, click Add to choose a directory to backup. You can leave it as “/” to backto the entire the computer if you want.


Click the Hosts tab and then click the Select a Host drop down list.


Click Start Full Backup to confirm.

The backup will happen and it


Click on the backup job to see backed up files.


BackupPC is a backup solution that can be configured to back up remote Linux and Windows systems. It can use a variety of different protocols and has a flexible scheduler to coordinate full and incremental backups.
I have installed this on ubutnu 14.04 LTS and its running fine for me for a long time since the installation
Open a terminal and enter the following commands:
sudo apt-get update
sudo apt-get install backuppc
During the installation, you will be asked what kind of mail server configuration is needed. We can select the "Local only" option, because we will not be configuring internet-aware mail
                ???????? Postfix Configuration ?????????
                ? General type of mail configuration:  ?
                ?                                      ?
                ?       No configuration               ?
                ?       Internet Site                  ?
                ?       Internet with smarthost        ?
                ?       Satellite system               ?
                ?       Local only                     ?
                ?                                      ?
                ?                                      ?
                ?                          ?
                ?                                      ?
                ????????????????????????????????????????
 ??????????????????????????? Postfix Configuration ???????????????????????????
 ? The "mail name" is the domain name used to "qualify" _ALL_ mail           ?
 ? addresses without a domain name. This includes mail to and from :   ?
 ? please do not make your machine send out mail from root@example.org       ?
 ? unless root@example.org has told you to.                                  ?
 ?                                                                           ?
 ? This name will also be used by other programs. It should be the single,   ?
 ? fully qualified domain name (FQDN).                                       ?
 ?                                                                           ?
 ? Thus, if a mail address on the local host is foo@example.org, the         ?
 ? correct value for this option would be example.org.                       ?
 ?                                                                           ?
 ? System mail name:                                                         ?
 ?                                                                           ?
 ? localhost________________________________________________________________ ?
 ?                                                                           ?
 ?
???????????????????? Configuring backuppc ???????????????????????????
? BackupPC supports any web server with CGI enabled, but this automatic ?
? configuration process only supports Apache. ?
? ?
? Which web server would you like to reconfigure automatically: ?
? ?
? [*] apache2 ?
? ?
? ?
? ?
? ?
??????????????????????????????????????????????????????????????????????????? Now change the password for backuppc
htpasswd /etc/backuppc/htpasswd backuppc
Enter the password when prompted.

create an SSH key pair for BackupPC user called backuppc and then transfer this key to the client computers.
Type
sudo su – backuppc

Generate an SSH key pair:
ssh-keygen
You will be prompted for three questions. Just press Enter to accept the default values.

Now we have the key pair, we need to transfer the public key.
Transferring the SSH Public Key
On the client computer, make sure you have the following configured:
We need to enable root account for SSH access. To do that, edit the file /etc/ssh/sshd_config and comment the line:
#PermitRootLogin without password
Add the line:
PermitRootLogin yes
Then restart SSH:
service ssh restart.
Note: you do not need the following user configured, but for my convenience, I have added a login for my own testing later. Ignore the italic text below.
useradd chuong
passwd chuong
mkdir /home/chuong
chown chuong:chuong /home/chuong
Now copy the key to the client computer:
SSH to root@10.0.0.10, you should be able to directly SSH to the client without having to supply a password for the user root. Verify that is the case.


Launch your browser and go to this URL:
http://10.0.0.12/backuppc.
Note: If for any reasons, the web page does not show up but it asks you to download a file that contains garbage characters in it (most probably happens in Ubuntu 14.04.1), you need to perform the followings to fix it:
rm /etc/apache2/conf-enabled/backuppc.conf
sudo ln /etc/backuppc/apache.conf /etc/apache2/conf-enabled/backuppc.conf
service apache2 restart
Then try again. When prompted for a credentials, use backuppc as the user name and the password you changed earlier.
Shown below is the main interface of BackupPC.

At this point /var/lib/backuppc is the default backuppc storage location and also the home directory of user backuppc.
Configure Client for BackupWe need to setup the client computer for backup. On the left hand side, click Edit Hosts.


Enter the IP address of the client computer, the user name should be backuppc. Click Add when done.


Configure Transfer Method
We will use rsync to transfer. Now we will configure this setting.Click Xfer tab. Under XferMethod, choose rsync. Under RsyncShareName, click Add to choose a directory to backup. You can leave it as “/” to backto the entire the computer if you want.

I add /etc/ppp to backup. Note that if you choose to backup the entire computer (using /), you have to exclude the /proc and the /sys directories. For now, remove the / so that the entire system is not backed up. We just want to backup /etc/ppp. Click Save.

CLick Schedule to check the backup schedules. As you can see, by default, full backup happens every 6.97 days and incremental backup happens every 0.97 days. We can keep these settings as is.

Run backup Manually
Let’s run the backup manually instead of waiting for 7 days.Click the Hosts tab and then click the Select a Host drop down list.

Click Start Full Backup

Click Start Full Backup to confirm.

The backup will happen and it

The backup should finish shortly as there are only a few files in our demonstration. The backup is stored at: /var/lib/backuppc/pc/10.0.0.10/#_of_backup.
In the Web interface, click the link to go back to the home page.
Click on the backup job to see backed up files.

As you can see, the directory /etc/ppp has been successfully backed up and the contents is stored on the backup server.


Install Firefox 60 on Ubuntu
Download The Latest Version of Firefox 60 from their FTP using wget
For 32 bit systems
wget https://ftp.mozilla.org/pub/firefox/releases/60.0/linux-i686/en-US/firefox-60.0.tar.bz2
For 64 bit systems
wget https://ftp.mozilla.org/pub/firefox/releases/60.0/linux-x86_64/en-US/firefox-60.0.tar.bz2
Extract the tar package
tar -xjf firefox-60.0.tar.bz2
Move the Firefox folder to opt
Remove the Older version of Firefox if it's there
sudo rm -rf /opt/firefox59
sudo mv firefox /opt/firefox60
Create the Symbolic link for new Firefox as default
sudo mv /usr/bin/firefox /usr/bin/firefoxold
sudo ln -s /opt/firefox60/firefox-bin /usr/bin/firefox

RAID Explained
RAID stands for Redundant Array of Inexpensive (Independent) Disks.
On most situations you will be using one of the following four levels of RAIDs.
RAID 0
RAID 1
RAID 5
RAID 10 (also known as RAID 1+0)
This article explains the main difference between these raid levels along with an easy to understand diagram.
In all the diagrams mentioned below:
A, B, C, D, E and F – represents blocks
p1, p2, and p3 – represents parity
RAID LEVEL 0
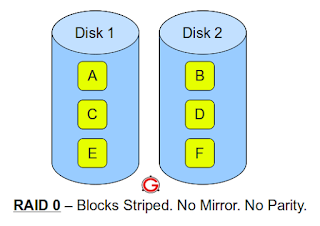
Minimum 2 disks.
Excellent performance ( as blocks are striped ).
No redundancy ( no mirror, no parity ).
Don’t use this for any critical system.
RAID LEVEL 1

Minimum 2 disks.
Good performance ( no striping. no parity ).
Excellent redundancy ( as blocks are mirrored )

Minimum 3 disks.

Minimum 4 disks.
This is also called as “stripe of mirrors”
Excellent redundancy ( as blocks are mirrored )
Excellent performance ( as blocks are striped )
If you can afford the dollar, this is the BEST option for any mission critical applications (especially databases).
On most situations you will be using one of the following four levels of RAIDs.
RAID 0
RAID 1
RAID 5
RAID 10 (also known as RAID 1+0)
This article explains the main difference between these raid levels along with an easy to understand diagram.
In all the diagrams mentioned below:
A, B, C, D, E and F – represents blocks
p1, p2, and p3 – represents parity
RAID LEVEL 0

Minimum 2 disks.
Excellent performance ( as blocks are striped ).
No redundancy ( no mirror, no parity ).
Don’t use this for any critical system.
RAID LEVEL 1

Minimum 2 disks.
Good performance ( no striping. no parity ).
Excellent redundancy ( as blocks are mirrored )
RAID LEVEL 5

Minimum 3 disks.
Good performance ( as blocks are striped ).
Good redundancy ( distributed parity ).
Best cost effective option providing both performance and redundancy.
Use this for DB that is heavily read oriented. Write operations will be slow.
RAID LEVEL 10

This is also called as “stripe of mirrors”
Excellent redundancy ( as blocks are mirrored )
Excellent performance ( as blocks are striped )
If you can afford the dollar, this is the BEST option for any mission critical applications (especially databases).
Backup Server on an Ubuntu 12.04 with BackupPC
BackupPC is a backup solution that can be configured to back up remote Linux and Windows systems.
It can use a variety of different protocols and has a flexible scheduler to coordinate full and incremental backups.
BackupPC is a powerful, user-friendly way to automatically backup files from several servers to a central location. Backups are essential for any kind of production environment. Just as important is making sure that file restoration operations function correctly.
There are many backup tools available for Linux and Unix-like operating systems. Choose the solution that fits your needs the best. BackupPC is a great tool that should work well in many developers' environments.
BackupPC is available in Ubuntu's default repositories.
The software "pulls" the data from client machines,
so the actual program needs to be installed on the machine that will function as the backup server.
The files will be stored at:
Open a terminal and enter the following commands:
sudo apt-get update
sudo apt-get install backuppc
During the installation, you will be asked what kind of mail server configuration is needed. We can select the "Local only" option, because we will not be configuring internet-aware mail:

On the next page, we can leave the Sytem mail name as "localhost":

Select "apache2" to configure Apache for use with BackupPC:

type "Enter" to continue with the installation.
Changing the Password
BackupPC uses a system user called "backuppc" to perform its tasks.
In addition, it configures an Apache user, also called "backuppc", with a randomly generated password, which was given briefly during installation. We can change this password to something more meaningful by typing:
sudo htpasswd /etc/backuppc/htpasswd backuppc
You will be asked to give and confirm a new password.
Configure SSH Access to Client Computers
There are a few different ways that servers and clients can communicate to authenticate and transfer data. In this guide, we will be using the rsync protocol over SSH.
To make this work, we'll need to create an SSH key pair for our system BackupPC user (called "backuppc", as mentioned above), and then transfer the key to the client machines.
First, log into the BackupPC user with the following command:
sudo su - backuppc
You will probably be presented with only a minimal prompt, represented by the dollar sign ($).
Generate an SSH key pair by typing:
ssh-keygen
You will be asked a number of questions. Just type "Enter" through all of the prompts to accept the default values.
Transferring the SSH Public Key
You now have a private and public key on your backup server. You need to transfer the public key to the root user on each client machine you wish to access.
You can do that by typing:
ssh-copy-id root@client_ip_address
Type "yes" to accept the new server's identity, and then enter the root password of the remote machine. The key should then be transferred.
Check that your key was transferred correctly by typing:
ssh root@client_ip_address
You should be able to log in without having to type a password.
Get back to the BackupPC server by typing:
exit
Back out of the "backuppc" account by typing "exit" again:
exit
Access the Web Interface
The rest of the guide will be configured through BackupPC's web interface.
Open a browser and navigate to:
backuppc_server_ip_address/backuppc
You will be prompted for a username and password. The username is "backuppc" and the password is what you set with the htpasswd command earlier.

Set Up Client Configuration
On the left-hand side, click on the "Edit Hosts" link.

Configure Transfer Settings
Click on the "Xfer" tab on the top of the page. Under "XferMethod", select "rsync". Under "RsyncShareName", select the path you would like to back up.
You can leave it at "/" to back up the entire computer. You can also click "Add" to add additional areas to back up if you choose not to target the entire computer.

If you are backing up the entire computer, you'll need to add an "excludes" rule.
In the "BackupFilesExclude" segment, type "*" to match all shares. Then insert the values "/proc" and "/sys" to exclude these directories from back up.

The default backup schedule is:
Full backup
Every 7 days
Keep only newest copy
Incremental backup
Every day
Keep the six most recent backups
If you would like to change the interval, click on the "Schedule" tab on the top bar.

Run a Manual Backup
To run your first full backup manually, select you client from the "Hosts" drop-down menu in the upper-left corner.
You will be taken to a client summary page. Click "Start Full Backup" under the "User Actions" section.
 You will confirm the action on the next page.

It can use a variety of different protocols and has a flexible scheduler to coordinate full and incremental backups.
BackupPC is a powerful, user-friendly way to automatically backup files from several servers to a central location. Backups are essential for any kind of production environment. Just as important is making sure that file restoration operations function correctly.
There are many backup tools available for Linux and Unix-like operating systems. Choose the solution that fits your needs the best. BackupPC is a great tool that should work well in many developers' environments.
BackupPC is available in Ubuntu's default repositories.
The software "pulls" the data from client machines,
so the actual program needs to be installed on the machine that will function as the backup server.
The files will be stored at:
/var/lib/backuppc/pc/ip_address_of_client/#_of_backup
Open a terminal and enter the following commands:
sudo apt-get update
sudo apt-get install backuppc
During the installation, you will be asked what kind of mail server configuration is needed. We can select the "Local only" option, because we will not be configuring internet-aware mail:

On the next page, we can leave the Sytem mail name as "localhost":

Select "apache2" to configure Apache for use with BackupPC:

type "Enter" to continue with the installation.
Changing the Password
BackupPC uses a system user called "backuppc" to perform its tasks.
In addition, it configures an Apache user, also called "backuppc", with a randomly generated password, which was given briefly during installation. We can change this password to something more meaningful by typing:
sudo htpasswd /etc/backuppc/htpasswd backuppc
You will be asked to give and confirm a new password.
Configure SSH Access to Client Computers
There are a few different ways that servers and clients can communicate to authenticate and transfer data. In this guide, we will be using the rsync protocol over SSH.
To make this work, we'll need to create an SSH key pair for our system BackupPC user (called "backuppc", as mentioned above), and then transfer the key to the client machines.
First, log into the BackupPC user with the following command:
sudo su - backuppc
You will probably be presented with only a minimal prompt, represented by the dollar sign ($).
Generate an SSH key pair by typing:
ssh-keygen
You will be asked a number of questions. Just type "Enter" through all of the prompts to accept the default values.
Transferring the SSH Public Key
You now have a private and public key on your backup server. You need to transfer the public key to the root user on each client machine you wish to access.
You can do that by typing:
ssh-copy-id root@client_ip_address
Type "yes" to accept the new server's identity, and then enter the root password of the remote machine. The key should then be transferred.
Check that your key was transferred correctly by typing:
ssh root@client_ip_address
You should be able to log in without having to type a password.
Get back to the BackupPC server by typing:
exit
Back out of the "backuppc" account by typing "exit" again:
exit
Access the Web Interface
The rest of the guide will be configured through BackupPC's web interface.
Open a browser and navigate to:
backuppc_server_ip_address/backuppc
You will be prompted for a username and password. The username is "backuppc" and the password is what you set with the htpasswd command earlier.

Set Up Client Configuration
On the left-hand side, click on the "Edit Hosts" link.

Click "Save" at the top of the page.
Click on the "Xfer" tab on the top of the page. Under "XferMethod", select "rsync". Under "RsyncShareName", select the path you would like to back up.
You can leave it at "/" to back up the entire computer. You can also click "Add" to add additional areas to back up if you choose not to target the entire computer.

If you are backing up the entire computer, you'll need to add an "excludes" rule.
In the "BackupFilesExclude" segment, type "*" to match all shares. Then insert the values "/proc" and "/sys" to exclude these directories from back up.

Configure Backup Schedule
The default backup schedule is:
Full backup
Every 7 days
Keep only newest copy
Incremental backup
Every day
Keep the six most recent backups
If you would like to change the interval, click on the "Schedule" tab on the top bar.

Note: You will notice that full backups have a value of "6.97" in "FullPeriod", and likewise, incremental backups have a value of "0.97" in the "IncrPeriod" field. These are values corresponding to 7 and 1 day respectively, since it accounts for the time to complete the backup as well.
You can modify the number of backups that the system maintains. You can also specify times when no backup should be performed by setting up "blackouts" where no backup can begin.
In this guide, we will stick with the default values.
Remember to click "Save" if you make any changes.
You can modify the number of backups that the system maintains. You can also specify times when no backup should be performed by setting up "blackouts" where no backup can begin.
In this guide, we will stick with the default values.
Remember to click "Save" if you make any changes.
Run a Manual Backup
To run your first full backup manually, select you client from the "Hosts" drop-down menu in the upper-left corner.
You will be taken to a client summary page. Click "Start Full Backup" under the "User Actions" section.


Your backup should complete shortly, depending on the size of the droplets.
if you have problem in back up with windows pc
please configure smb in your ubuntu pc
if you want more help i will write it in here as i do
Mfc100u.dll errors
Mfc100u.dll errors are caused by situations that lead to the removal or corruption of the mfc100u DLL file,

an important part of the Visual C++ runtime library supplied by Microsoft.
There are several different ways that mfc100u.dll errors can show up on your computer.
Here are some of the more common ways that you might see mfc100u.dll errors:
Mfc100u.dll Not Found
This application failed to start because mfc100u.dll was not found. Re-installing the application may fix this problem.
Cannot find [PATH]\mfc100u.dll
The file mfc100u.dll is missing.
Cannot start [APPLICATION]. A required component is missing: mfc100u.dll. Please install [APPLICATION] again.
If you have 64bit Windows system, install
http://www.microsoft.com/download/en/confirmation.aspx?id=13523
If that does not fix the problem, install
http://www.microsoft.com/download/en/confirmation.aspx?id=8328
This should solve problem.
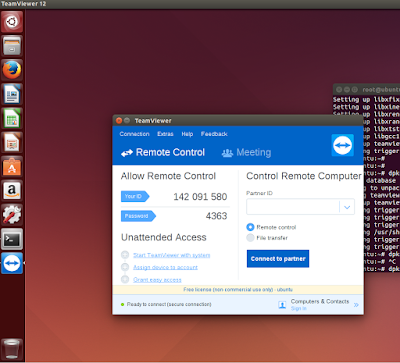
Installing TeamViewer on Ubuntu
Download the TeamViewer from their website through your web browser and you can install it via GUI.
or use the CLI.
Be the root Like the boss as firt.
sudo su
Get it here
https://teamviewer.en.uptodown.com/ubuntu
Navigate to the directory
where it is downloaded
and Install the package.
dpkg -i teamviewer-10-0-36281-multi-ubu.deb
if there any problm during instalation
apt-get install -f

or use the CLI.
Be the root Like the boss as firt.
sudo su
Get it here
https://teamviewer.en.uptodown.com/ubuntu
Navigate to the directory
where it is downloaded
and Install the package.
dpkg -i teamviewer-10-0-36281-multi-ubu.deb
if there any problm during instalation
apt-get install -f
Subscribe to:
Posts (Atom)
What is SIP trunking
What is SIP trunking.. (Session Initiation Protocol trunking) SIP trunking is a service that a communication provider offers. it uses the S...

-
 BACKUPPC INSTALLATION AND CONFIGURATIONS BackupPC is a backup solution that can be configured to back up remote Linux and Windows systems...
 -
 Flash is now officially dead. with this way you can still use Flash. if you have any problem while installing or working on this please fe...
 -
 Physical topologies The mapping of the nodes of a network and the physical connections between them – i.e., the layout of wiring, cables...